# Your First Scenario
A step-by-step tutorial to authoring your first interactive scenario
# Introduction & Context
# Prerequisites
To author interactive scenarios, you must already be familiar with:
- Using the Linux command-line interface (specifically, a bash terminal)
- Git (cloning a repository, making commits, and pushing commits to a server)
- Markdown (writing text and basic formatting syntax)
- JSON (file format)
Of course, you'll also need expertise in the subject matter of your scenario.
# What's a Scenario?
Scenarios are interactive, preconfigured, sandboxed development environments accompanied by instructional lessons. A well-crafted scenario will provide a focused and concise lesson, teaching the learner how to use a specific tool or approach to accomplish a specific task.
As an example, please see this collection of scenarios, “Learn Kubernetes using Interactive Browser-Based Scenarios.” The first scenario in this series, “Launch A Single Node Cluster” illustrates the basic elements of a scenario:
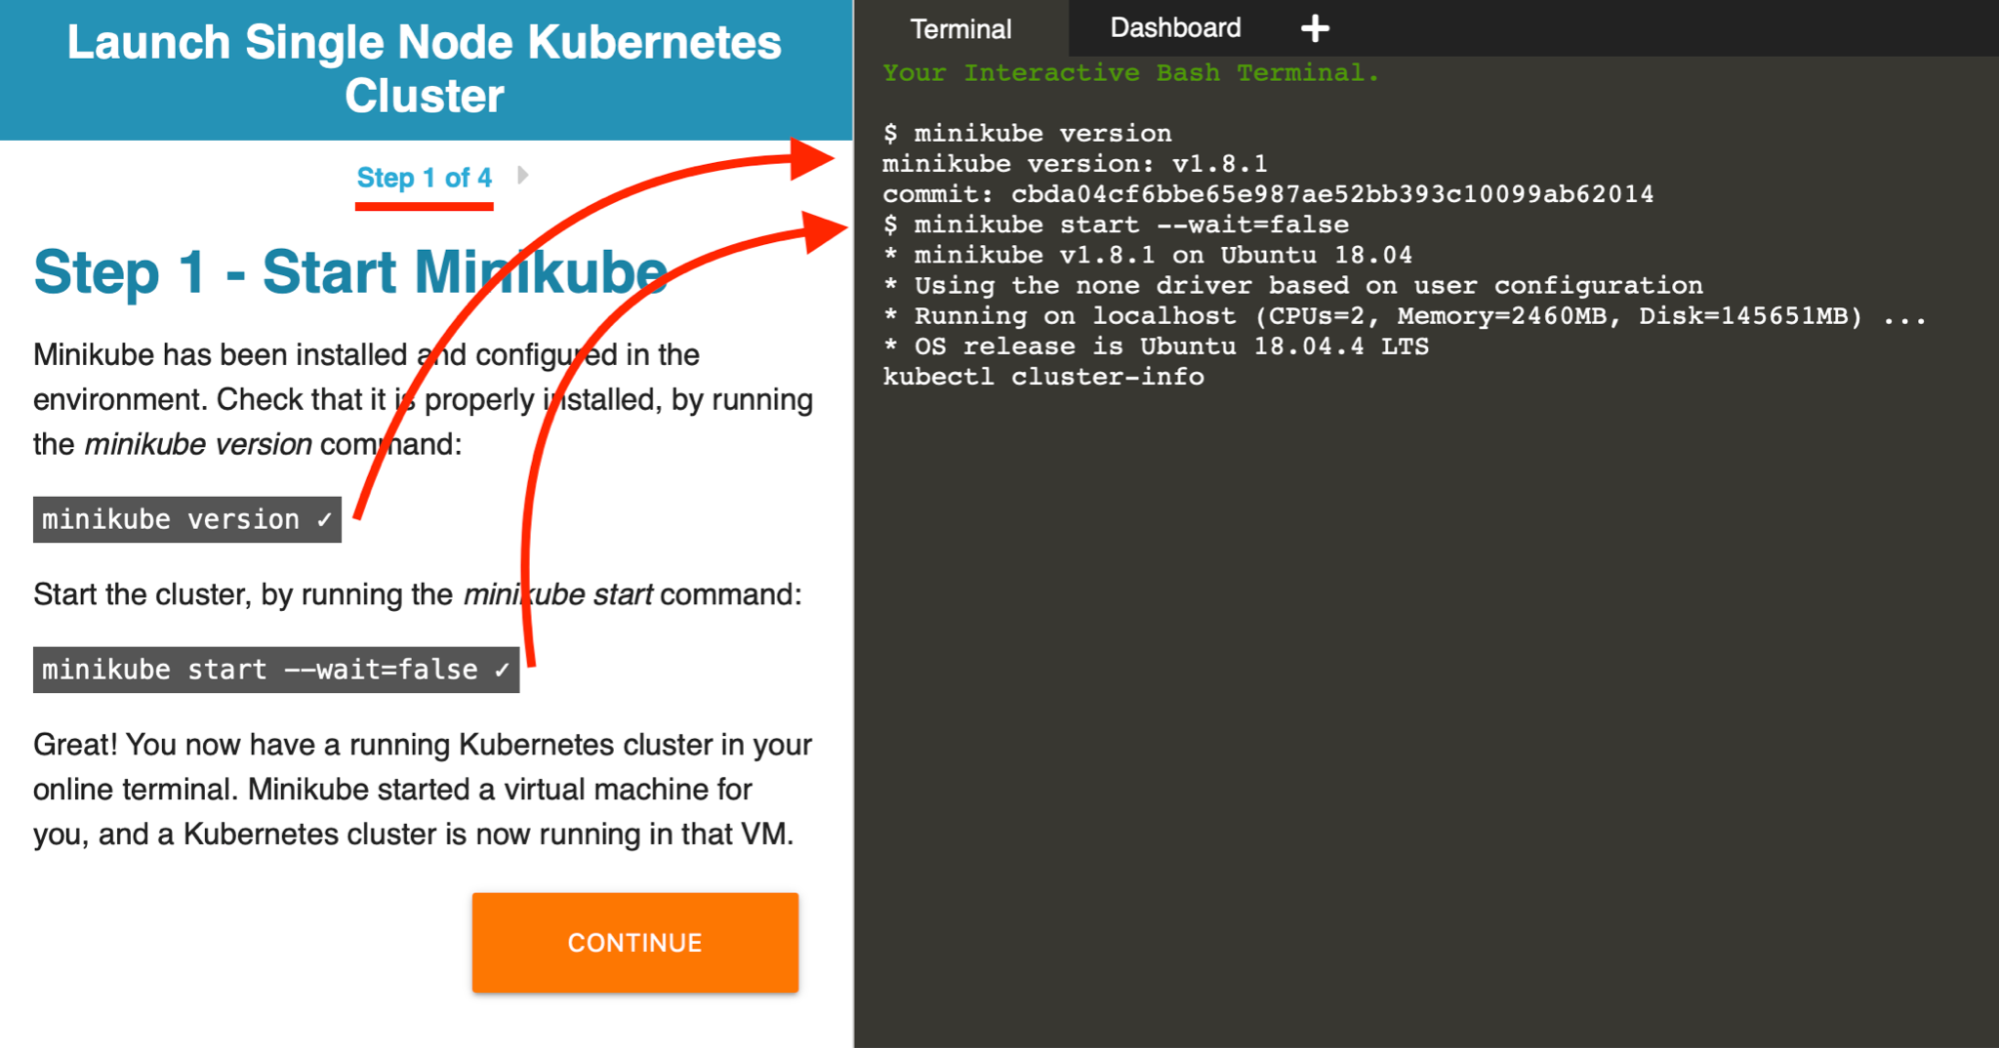
Things to note:
- The lesson text is in a dedicated panel at left.
- The lesson is split into "steps".
- On the right is the live development environment — in this case a single terminal.
- Some elements in the lesson text are interactive and clickable — such as the highlighted code blocks, which, when clicked, are executed in the terminal at right.
# How Do Scenarios Work?
At a high level:
- Each scenario starts from an underlying base image (such as
ubuntu:2004orpython:3.8) - The base image is spun up on demand into a live environment
- Customizations are applied to the live environment at run time
- The learner interacts with the sandboxed environment (typically with root privileges)
- Sessions expire and the environment is destroyed whenever:
- The tab or window is closed, or
- An hour elapses
- Nothing is saved; reloading the tab/window spins up a fresh environment
Note that a learner's progress and data are ephemeral and cannot be recovered, even when the same learner restarts the same scenario.
For example:
- The source code for the Ubuntu 20.04 example is here: https://github.com/katacoda/scenario-examples/tree/main/environment-usages/ubuntu-2004
- This scenario is based on the
imageidofubuntu:2004as listed here: https://www.katacoda.community/essentials/environments.html - Visiting this link will spin up an instance of the scenario on demand: https://katacoda.com/scenario-examples/courses/environment-usages/ubuntu-2004
# What's Supported & What's Not
Generally speaking, anything that can be installed in a Linux environment via command line can be run inside an interactive scenario. However, there are some constraints:
- Most of the base images are allotted ~1.5 GB of RAM, with some minor variations. This is sufficient for most purposes, but may be a limiting factor when dealing with large data sets.
- The size limit for assets is currently 9 MB per file. There is no limit to the number of assets, but more assets will increase the loading time of the scenario.
- Scenarios are CPU-only; you cannot run GPU processes.
- The learner's patience is a limited resource; keep loading times as short as possible for the best learning experience. Ideally, any configuration that happens at runtime would complete in less than a minute. (For most scenarios, it's much less than that, and the scenario is ready for interaction by the time the intro screen is dismissed.) If your scenario involves any data processing, consider reducing the size of the sample data set until the processing steps take no more than one minute each.
- Note that a scenario's session times out after one hour. Most learners won't stick around that long, anyway, but you should be aware of this hard limit.
# Creating Your First Scenario
# ❗ O'Reilly authors: Clone your O'Reilly-provided repo to your local machine.
O'Reilly will set up accounts for you on both katacoda.com and also on our private GitLab instance (resources.oreilly.com). Please make sure that you can login to each of these services.
Your O'Reilly contact will provide you with two URLs unique to you:
- an O'Reilly-specific katacoda.com profile page (e.g.
https://katacoda.com/username) - an O'Reilly-hosted git repo on
resources.oreilly.com
Clone your repo onto your local machine.
# ❗ Independent authors: Set up your account and repo.
Go to katacoda.com and create a new account. Login, and click "claim your profile" in the top right. During the "configure git" step, Katacoda will ask to connect to your GitHub account, where it will create a new repo called katacoda-scenarios.
Finally, clone your new repo onto your local machine.
# All authors: Copy the template.
Check your repo's contents. If it doesn't already include a copy of the new-scenario-template, then please download a copy from this repo:
https://github.com/oreillymedia/katacoda-examples
Place the copy of the new-scenario-template in your new Katacoda repo. Then
git add new-scenario-templategit commit -m "Added new scenario template"git push
Wait 30-60 seconds, then refresh your katacoda.com profile page to make sure the new scenario appears. Your profile URL will be something like:
https://katacoda.com/username
You do not need to install the Katacoda CLI to author scenarios; that step can be skipped.
# Note the directory structure, with one subfolder for each scenario.
Generally speaking, each scenario you create will live in its own subdirectory within the repo.
Your repo's hierarchy should look like this:
repo-name
├── first-scenario-name
├── second-scenario-name
└── third-scenario-name
NOTE: All directories and filenames should be lowercase.
# Duplicate and rename the new-scenario-template directory.
This template is a good starting point for your first scenario, as it already includes all the basic elements. Look inside this folder and note:
index.json— the config file for your scenario, including where you specify the title, description, level, and estimated time to complete, as shown to learnersintro.mdandfinish.md— Markdown files for text shown at the start and endstep1.md,step2.md… — Markdown files for the lesson text shown alongside each "step" of the scenarioforeground.sh— a shell script executed at runtime
Duplicate the template and rename the new directory. Important note: All directory names must be lowercase and cannot begin with a capital letter. For example, regex-intro will work, but RegEx-Intro will not.
# Choose a base image.
The base image is your starting point. Review the list of supported images and choose the base image that is most like what you need. Note the corresponding imageid, and set that value in the index.json.
For example, the template scenario uses:
"imageid": "ubuntu:2004"
# Choose a layout.
The template uses the simplest possible layout:
"uilayout": "terminal"
This shows a terminal panel at right, with lesson text on the left.
There are several alternate UI layouts. Explore the examples and decide what's most appropriate for your project. Reference the layout doc page, then, in index.json, set the corresponding uilayout value.
# Choose an IDE.
You're not required to have an IDE panel (terminal-only is OK!), but if you do want a code/text editor, note that we currently support two different IDEs:
- "Editor" (Katacoda's default, built-in IDE — barebones, but quick to load)
- VS Code (full-featured, but slower to load)
To use VS Code, review the docs and note that additional config may be needed.
# Commit changes, push to remote, then test the scenario.
The basic workflow of authoring a Katacoda scenario is:
- Make edits
- Save changes
- Commit changes locally with git
- Push commits back to remote (
resources.oreilly.coma.k.a. GitLab) - Wait 30-60 seconds, then in your browser, refresh the scenario
All of your scenarios can be found on your katacoda.com profile page, which is something like: https://katacoda.com/orm-firstname-lastname/
You cannot preview changes or run Katacoda locally, as it is a cloud-based service.
Once you've verified that the initial scenario is loading, continue on to...
# Customize the environment.
Commonly, your scenario will need other software packages preinstalled or configured before the user starts pursuing the lesson. This is when you apply customizations to the base image that you selected earlier. Customizations are made by executing shell scripts at runtime.
In the new-scenario-template, a bash shell script called foreground.sh is executed at runtime.
Note the line in index.json that specifies to run this script.
    "intro": {
      "text": "intro.md",
      "code": "foreground.sh"  // <-- When the `intro` step loads, execute foreground.sh
    },
The "code" property specifies a script to run in the foreground. You can also execute a script in the background (meaning output is not shown to the user in the terminal) using the "courseData" property. For example:
    "intro": {
      "text": "intro.md",
      "courseData": "background.sh"  // <-- When the `intro` step loads, execute background.sh
    },
You can specify scripts to run at the start of any step (not just intro), but it's most common to do so with intro, as that executes immediately when the scenario loads.
See “Customizing Environments” for more detail.
# Load in example data or supporting files.
Finally, if your scenario relies on any example data or supporting files (e.g., example code or images), follow these steps:
- Create a new subdirectory in your scenario folder called
/assets. (NOTE: It is important that all directory and filenames be lowercase! Files in an/Assetsdirectory will not get copied over to the environment.) - Copy any assets into the
/assets, then add and commit them to the repo. - In
index.json, at the bottom of thedetailsobject, add a newassetsobject to specify which assets you want copied over, from the repo and into the environment, at runtime. The simplest possible syntax copies all files found/assetsand places them in the scenario's default directory,/root:
	"details": {
		"steps": [ … ],
		"intro": { … },
		"finish": { … },
		"assets": {
			"client": [
				{ "file": "*", "target": "~/" }
			]
		}
	},
Note that the target directory can be anything you want. In this example, ~/ maps to /root, since root is the default user, and /root is that user's home directory.
The example below copies over three specific assets. Instead of using the * wildcard to select all assets, two files are copied into the home directory, while a third is copied into /usr/local/bin and its permissions are set to executable.
	"details": {
		"steps": [ … ],
		"intro": { … },
		"finish": { … },
		"assets": {
			"client": [
				{ "file": "sample_code.py", "target": "~/" },
				{ "file": "sample_data.csv", "target": "~/" },
				{ "file": "sneaky_script.sh", "target": "/usr/local/bin/", "chmod": "+x" }
			]
		}
	},
Keep your assets lightweight; each asset is limited to 9 MB per file. There is no limit to the number of assets, but using more assets will increase the loading time of the scenario.
See this example for more detail:
- Live scenario: https://katacoda.com/scenario-examples/scenarios/upload-assets
- Source: https://github.com/katacoda/scenario-examples/tree/main/upload-assets
# Congratulations!
At this point, you should have your first working scenario.
If not, please let us know how we could improve this tutorial by emailing us at [email protected].